Apple’s Boot Camp Assistant is a valuable tool that can be used to install Windows on your Mac, create Windows partition, as well as remove existing ones. It provides the necessary drivers for Windows to recognize and use all of your Mac hardware. It also provides a Windows control panel that lets you select the environment the Mac will boot into.
With the Apple drivers that Boot Camp Assistant provides, you may discover that Windows and your Mac hardware are one of the best combinations for running Windows. With the help of Boot Camp Assistant, you can run Windows natively on your Mac. This is how you can use Boot Camp Assistant to install Windows on your Mac:
System Requirements
- Firstly, Boot Camp Assistant 6.x. or later.
- Secondly, macOS Sierra or later.
- Thirdly, 50 GB or more of free space on your hard drive or SSD.
- Fourthly, a keyboard and mouse or built-in keyboard and trackpad.
- Also, a full install disc or ISO of Windows 7, Windows 8, or Windows 10.
- Lastly, an MS-DOS (FAT) formatted flash drive.
Which Versions of Windows Are Supported?
Since Boot Camp Assistant downloads and creates the Windows drivers needed to finish the Windows install, you need to know which version of Boot Camp Assistant works with which version of Windows.
- Firstly, Boot Camp Assistant 4.x: Windows 7
- Boot Camp Assistant 5.x: 64-bit Windows 7, 8
- Thirdly, Boot Camp Assistant 6.x: 64-bit Windows 10
Your Mac will have a single version of Boot Camp Assistant, making it difficult though not impossible, to install other versions of Windows that aren’t directly supported by the version of Boot Camp Assistant you’re using.
To install alternate Windows versions, you’ll need to manually download and create the Windows Support Drivers.
How To Install Windows On A Mac – Macworld UK
https://www.macworld.co.uk › How to › Software How to
How to run Windows on a Mac via Boot Camp; > — Step 1: Open Boot Camp Assistant. · Step 2: Download driver software · Step 3: Partition your drive.
How to install Windows 10 on your Mac using Boot Camp | iMore
https://www.imore.com › Help & How To › macOS
Launch Boot Camp Assistant from the Utilities folder in Applications. · Click Continue. · Click and drag the slider in the partition section.
Configuring BootCamp on your Mac
https://www.cuw.edu › BootCampInstructions
To install Windows, use Boot Camp Assistant, which is included with your Mac. 1. Use Boot Camp Assistant to create a Windows partition. Open Boot Camp Assistant
Install Windows 10 on your macOS computer using Boot …
https://kb.iu.edu › bewm
Use Boot Camp Assistant — In macOS, the Boot Camp Assistant app
Process Description
- Back up your data
Part of the process of installing Windows on your Mac involves repartitioning the Mac’s drive. While Boot Camp Assistant is designed to partition a drive without any data loss, there is always the possibility that something can go wrong. So, before going any further, back up your Mac’s drive now. There are several backup applications available such as Time Machine, SuperDuper, Carbon Copy Cloner, Apple’s Disk Utility, and so on.
When your backup is finished, you can then proceed to Boot Camp Assistant.
-
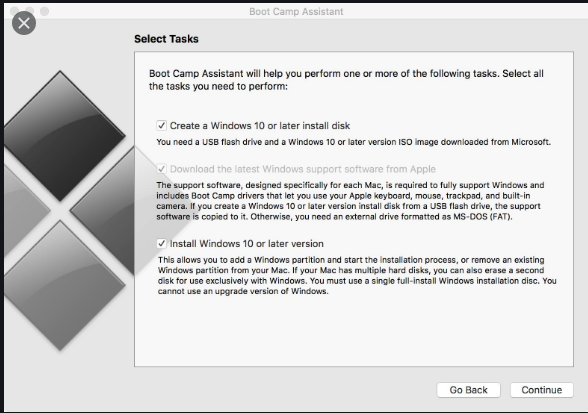
Boot Camp Assistants Three Tasks
Boot Camp Assistant can perform three basic tasks to help you get Windows running on your Mac, or uninstall it from your Mac. Depending on what you wish to accomplish, you may not need to make use of all three tasks which include:
- Create a Windows 10 or later install disk – Boot Camp Assistant can use a USB flash drive or an external USB drive to create and install a disk from a Windows 10 ISO image file. There are various ways to acquire the ISO image file of Windows, but the easiest is to simply download the image file directly from Microsoft.
- Download the latest Windows support software from Apple – With this option, your Mac downloads the latest Windows 10 drivers and supporting software that allows Windows to work with your Mac’s hardware. The support software will be copied to the USB flash drive you are using for the Windows 10 install disk.
- Install Windows 10 or later version – This option will either create a Windows partition on your Mac’s startup drive or allow you to remove a Windows partition if one is already present. The actual name of this option will change if you already have a Windows partition on your Mac to Remove Windows 10 or a later version.
If you are creating a Windows partition, your Mac will automatically start the Windows installation process once the appropriate partition is created.
If you’re removing a Windows partition, this option will not only delete the Windows partition but also merge the newly freed space with your existing Mac partition to create one larger space.
-
Selecting the Tasks
Place a checkmark next to the tasks you wish to perform. You can select more than one task; the tasks will be performed in the appropriate order. Normally you would select all of the tasks and have Boot Camp Assistant run them all for you concurrently. You can also select one task at a time; it makes no difference to the final outcome. In this guide, we will treat each task as if you selected it separately. So, to make proper use of this guide, follow the instructions for each task you select. Remember that if you select more than one task, your Mac will automatically continue on to the next task.
-
Boot Camp Assistant – Create the Windows Installer
Boot Camp Assistant needs to create a Windows 10 installer disk. To perform this task, you need a Windows 10 ISO image file to be available. The ISO file can be stored on your Mac’s internal drives, or on an external drive.
Make sure the USB flash drive you intend to use as the bootable Windows install disk is connected to your Mac.
- If needed, launch Boot Camp Assistant.
- In the Select, Task window make sure there is a checkmark in the box labeled Create a Windows 10 or later install disk.
- You can remove checkmarks from the remaining tasks to perform just the install disk creation.
- When you’re ready, click Continue.
- Click the Choose button next to the ISO Image field, then navigate to the Windows 10 ISO image file you have saved on your Mac.
- In the Destination Disk section, select the USB flash drive you wish to use as the bootable Windows installer disk.
Warning:
The selected destination disk will be reformatted causing all data on the selected device to be erased.
- Click the Continue button when ready.
- A drop-down sheet will appear to warn you about the possibility of data loss. Click the Continue button.
- Boot Camp will create the Windows Installer drive for you. This process can take a bit of time. When complete Boot Camp Assistant will ask for your administrator password so it can make changes to the destination drive. Supply your password and click OK.
-
Boot Camp Assistant – Create the Windows Drivers
Boot Camp Assistant can create the needed Window drivers. In order to get Windows working on your Mac, you need the latest version of the Apple Windows support software. Boot Camp Assistant allows you to download the Window drivers for your Mac’s hardware to ensure that everything will work at its best.
- Launch Boot Camp Assistant, located at /Applications/Utilities.
- Boot Camp Assistant will open and display its introduction screen. Be sure to read through the introductory text, and pay heed to the advice to have your portable Mac connected to an AC cord. Don’t rely on batteries during this process.
- Click the Continue button.
- Download the Windows Support Software (Drivers)
- The Select Tasks step will display. Put a checkmark next to “Download the latest Windows support software from Apple.”
- Remove the checkmarks from the remaining two items.
- Click Continue.
- Save Windows Support Software
You have the choice to save the Windows support software to any external drive attached to your Mac, including a USB flash drive.
Saving to a USB Flash Drive
- Start by preparing your USB flash drive. It will need to be formatted in the MS-DOS (FAT) format. Formatting the USB flash drive will erase any data already on the device, so make sure the data is backed up somewhere else if you want to keep it.
- Once you format the USB drive, you can quit Disk Utility and continue with Boot Camp Assistant.
- In the Boot Camp Assistant window, select the flash drive you just formatted as the Destination Disk, then click Continue.
- Boot Camp Assistant will start the process of downloading the latest versions of the Windows drivers from the Apple support website. Once downloaded, the drivers will be saved on the selected USB flash drive.
- Boot Camp Assistant may ask you for your administrator password in order to add a helper file during the writing of the data to the destination location. Provide your password and click the Add Helper button.
- Once the Windows support software has been saved, Boot Camp Assistant will display a Quit button. Click Quit.
The Windows Support folder, which includes the Windows drivers and a setup application, is now stored on the USB flash drive. You will use this flash drive during the Windows install process. You can keep the USB flash drive plugged in if you will be installing Windows soon, or eject the drive for later use.
Saving to a CD or DVD
If you’re using Boot Camp Assistant 4.x, you can also choose to save the Windows support software to a blank CD or DVD. Boot Camp Assistant will burn the information to the blank media for you.
- Select “Burn a copy to CD or DVD.”
- Click Continue.
- Boot Camp Assistant will start the process of downloading the latest versions of the Windows drivers from the Apple support website. Once the download is complete, Boot Camp Assistant will ask you to insert blank media into your Superdrive.
- Insert the blank media into your optical drive, and then click Burn.
- Once the burn is complete, the CD or DVD will be ejected. You will need this CD/DVD to complete the installation of Windows 7 onto your Mac, so be sure to label the media and keep it in a safe place.
- Boot Camp may ask for your administrator password in order to add a new helper tool. Provide your password and click Add Helper.
- The process of downloading and saving the Windows support software is complete. Click the Quit button.
-
Boot Camp Assistant – Create the Windows Partition
One of the primary functions of Boot Camp Assistant is to divide Mac’s drive by adding a partition dedicated to Windows. The partitioning process allows you to select how much space will be taken from your existing Mac partition and assigned for use in the Windows partition. If your Mac has multiple drives, as some iMacs, Mac minis, and Mac Pros do, you will have the option to select the drive to partition. You can also choose to dedicate an entire drive to Windows.
If you have a single drive, you won’t be given the choice of which drive to use, but you will still be able to assign the amount of space you wish to use for Windows.
- Launch Boot Camp Assistant, located at /Applications/Utilities.
- Boot Camp Assistant will open and display its introduction screen. If you’re installing Windows on a portable Mac, be sure the Mac is connected to an AC power source. You don’t want your Mac to shut down halfway through this process because its battery ran out of juice.
- Click Continue.
- The Select Tasks option will display, allowing you to select one (or more) of the three different functions that Boot Camp Assistant can perform.
- Place a checkmark next to Install Windows 10 or later.
- While you can select all of the tasks to be done at once, this guide assumes your doing them one at a time, so remove the other two checkmarks from the task list.
- Click Continue.
- If your Mac has multiple internal drives, you will be shown a list of the available drives. If your Mac has a single drive, skip this step and go on to step 12.
FURTHERMORE;
- Select the drive you wish to use for the Windows installation.
- You can choose to split the drive into two partitions, with the second partition to be used for the Windows installation, or you can dedicate the entire drive for use by Windows. If you choose to use the entire drive for Windows, any data currently stored on the drive will be erased, so be sure to back this data up to another drive if you want to keep it.
- Make your selection and click Continue.
- The hard drive you selected in the above step will display with one section listed as macOS and the new section listed as Windows. No partitioning has been performed yet; first, you need to decide how large you want the Windows partition to be.
- Between the two proposed partitions is a small dot, which you can click and drag with your mouse. Drag the dot until the Windows partition is the desired size. Note that any space you add to the Windows partition will be taken from the free space currently available on the Mac partition.
- Once you’ve made the Windows partition the desired size, you’re ready to begin the process of creating the partition and installing Windows 10. Be sure to have your bootable USB flash drive with Windows 10 Installer handy, as well as the Windows support software you created in an earlier step.
- Close any other open applications, saving any app data as needed. Once you click the Install button, your Mac will partition the selected drive and then automatically restart.
- Insert the USB flash drive containing Windows 10 Install disk, and then click Install.
Boot Camp Assistant will create the Windows partition and name it BOOTCAMP. It will then restart your Mac and begin the Windows installation process.
Boot Camp Assistant 4.x – Installing Windows 7
At this point, Boot Camp Assistant has partitioned your Mac’s drive and restarted your Mac. The Windows 10 installer will now take over, to complete the installation of Windows 10. Just follow the onscreen instructions provided by Microsoft.
During the Windows 10 installation process, you will be asked where to install Windows 10. You will be shown an image depicting the drives on your Mac and how they are partitioned. You may see three or more partitions. It is very important that you only select the partition that has BOOTCAMP as part of its name. The partition’s name starts with the disk number and partition number and ends with the word BOOTCAMP.
- Select the partition that includes the BOOTCAMP name.
- Secondly, click the Drive Options (Advanced) link.
- Click the Format link, and then click OK.
- Fourthly, click Next.
- From here you can continue to follow the normal Windows 10 installation process.
Eventually, the Windows install process will complete, and your Mac will reboot into Windows.
Install Windows Support Software
Normally, after Windows 10 installer completes and your Mac reboots into the Windows environment, the Boot Camp Driver installer will startup automatically. If it doesn’t start on its own you can manually start the installer:
- Make sure the USB flash drive containing the Boot Camp driver installer is connected to your Mac. This is normally the same USB flash drive that was used to install Windows 10, but you could have created a separate flash drive with the driver installer if you selected the tasks in the Boot Camp Assistant independently instead of performing all tasks at once.
- Open the USB flash drive in Windows 10.
- Within the BootCamp folder, you will find a setup.exe file.
- Double click the setup.exe file to start the Boot Camp driver installer.
- Follow the onscreen instructions
- You will be asked if you want to allow Boot Camp to make changes to your computer. Click Yes, and then follow the onscreen instructions to complete the installation of Windows 10 and the Boot Camp drivers.
- Once the installer finishes its task, click the Finish button.
Your Mac will reboot to the Windows 10 environment.
Selecting the Default Operating System
The Boot Camp driver installs the Boot Camp Control Panel. It should be visible in the Windows 10 System Tray. If you don’t see it, click the upward-facing triangle in the system tray. Any hidden icons, including possibly the Boot Camp Control Panel, will be displayed.
- Select the Startup Disk tab in the control panel.
- Select the drive (OS) you wish to set as the default.
- The macOS has a similar Startup Disk preference pane that you can use to set the default drive (OS).
- If you need to boot to another OS on a temporary basis, you can do so by holding down the Option key when you start your Mac and then selecting which drive (OS) to use.
Special note:
It’s highly recommended that the USB flash drive used in this guide be connected directly to one of your Mac’s USB ports. Do not connect the flash drive to your Mac via a hub or other device. Doing so can cause the Windows to install to fail.